


How to Self Tan | A Step by Step Guide to Natural Results
Short answer: Exfoliate about 10 minutes before applying and make sure your skin is fully dry. Apply self tanner in sections with a mitt, using 2 to 3 pumps per body part, then let it dry fully before dressing in loose, dark clothing. Avoid water and sweat while it develops, then moisturize daily to extend your glow. The rest of this guide covers the science, history, tools, and pro tips behind getting it right every time.
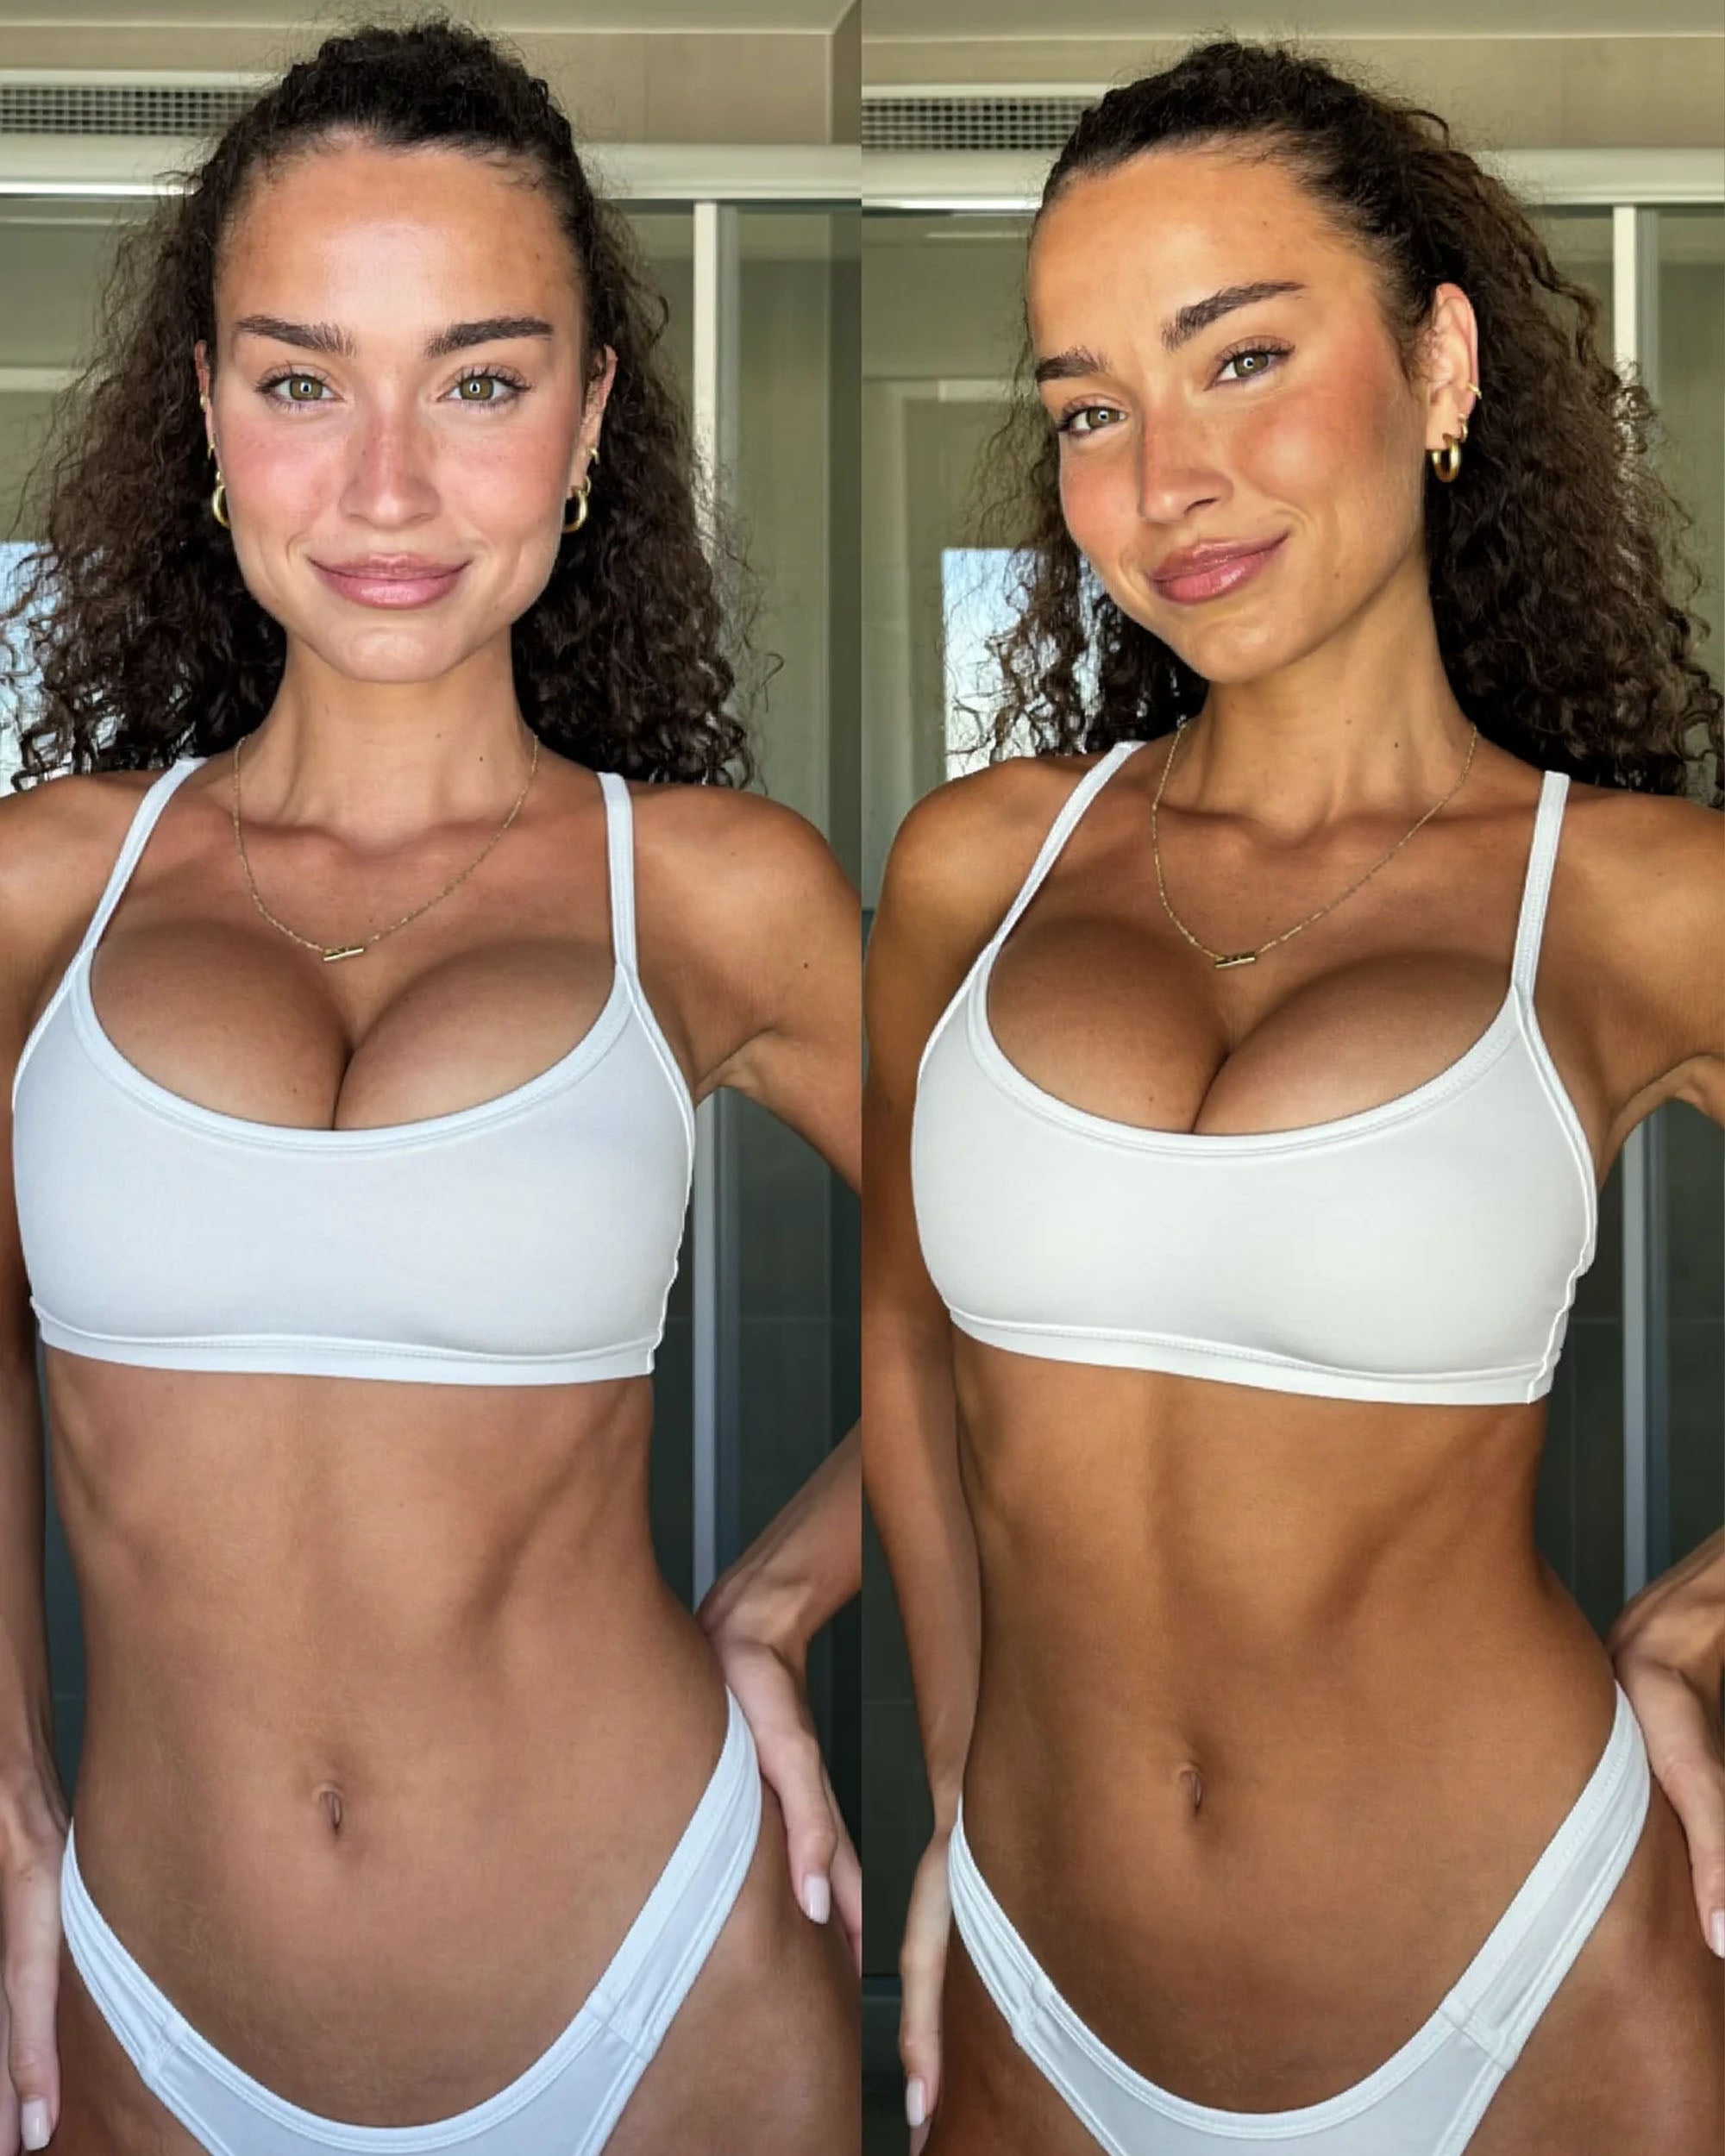
How to self tan is simple. Exfoliate about 10 minutes before applying and make sure your skin is completely dry. Apply self tanner in sections with a mitt, using 2 to 3 pumps per body part. Use long sweeping motions on arms, legs, and torso. Blend wrists, hands, ankles, and feet with the leftover product on your mitt. Let your tan dry fully, then dress in loose, dark clothes. Avoid water, sweat, and tight seams while it develops. Moisturize daily to keep your glow. This guide adds the science, the history, the right tools, and pro tips from our own co-founder's decade of self tanning and years of professional spray tanning experience, so you get a natural, streak free result every time.

Table of Contents
- What Self Tanning Is (and How It Works)
- How to Self Tan Step by Step
- How to Apply Self Tanner by Product Type
- Choosing the Right Self Tanner for Your Skin
- Pro Tips for a Flawless, Long-Lasting Tan
- Removing Self Tanner
- Troubleshooting and Common Mistakes
- Self Tanning FAQs
- Shop the Makai Self Tanning Collection
- Keep Reading: More Self Tanning Guides
- The Bottom Line
What Self Tanning Is (and How It Works)
Self tanning is a cosmetic process that gives skin a bronze look without UV exposure. Most formulas use DHA to react with proteins on the outer layer of skin. Color develops in hours and fades as your skin renews. You get control, speed, and even results without sun damage. Remember, self tan does not include SPF. Wear sunscreen any time you are outside.
How Does DHA Work
DHA is a sugar derived active. According to the U.S. Food and Drug Administration, it reacts with amino acids in the stratum corneum in a Maillard type reaction. That creates melanoidin pigments that look like a tan. Development typically takes 2 to 8 hours. The tan fades over 5 to 10 days as dead skin sheds. Some products pair DHA with erythrulose for a softer fade.
This is the part of the formula most people never think about, but it is the part we obsessed over most. Early on, we tested self tanning formulas on Toni and her friends and learned fast that not all self tanners are created equal. Some went on sticky, some had a strong smell, some faded orange or patchy no matter how carefully they were applied. The biggest lesson from that process was that how a self tanner fades matters just as much as how it looks on day one. A tan that fades evenly is what actually makes it buildable. You can layer on more color over a few days and it still looks natural, because the base layer is breaking down evenly instead of in blotches. That single detail, fade quality, drove a lot of how we approached formulating DHA and erythrulose ratios for MAKAI.
One thing that compounds this even further: if your first application starts with proper exfoliation, every application after that fades better and applies smoother. A clean, even base is not just a one-time nice to have, it is the foundation the rest of your buildable color depends on.
The History of Self Tanning
Tans became fashionable in the 1920s. The first mass market self tanners appeared in the 1950s. Early versions could look orange and streaky. Formulas improved through the 80s and 90s. Today, textures, shades, and skin friendly ingredients make sunless tanning a safe, modern routine at home and in studios.
Our own history with self tanning goes back further than MAKAI does. Our co-founder Toni started self tanning as a teenager, and it was not about vanity. Her mom was diagnosed with late stage melanoma, and watching her fight through it and survive made skin safety a permanent part of how our family thinks about the sun. Self tanning became the way Toni could still get color without the risk, and that habit turned into a decade plus of daily use, then a professional spray tanning career, then MAKAI. So when we talk about the history of self tanning in this guide, it is not just a timeline we researched. It is genuinely where this brand started.
How to Self Tan Step by Step
Our co-founder Toni has been self tanning for over a decade, and her routine has stayed simple the entire time. She showers and exfoliates about 10 minutes before she plans to apply, then makes sure her skin is completely dry before she starts.
For product amounts, she sticks to roughly 2 to 3 pumps per body part. That means 2 to 3 pumps for each leg, 2 to 3 for each arm, and 2 to 3 for the lower back, upper back, chest, and shoulder area. She always starts by rubbing the product in using a circular motion. Covering more ground initially makes it much easier to see what you have missed and go back over it before the formula sets.
- Exfoliate about 10 minutes before applying and make sure skin is fully dry.
- Use 2 to 3 pumps per body part as a general guide.
- Work in sections with a mitt. Arms, legs, torso, back.
- Start with circular motions to cover ground, then smooth and blend.
- Blend wrists, hands, ankles, feet with leftover mitt product.
- Let skin dry fully. Dress in loose, dark clothing.
- Keep skin dry while it develops. Avoid sweat and water.
- Moisturize daily to keep your glow fresh.
If you are using your tan to build color over time rather than starting fresh, you do not need to exfoliate every single application. But for that first use, Toni never skips it. For extra help with tricky spots, see our guide on how to apply self tanner to hard to reach areas.
Prep and aftercare guides: how to exfoliate before tanning.
One thing that is easy to overlook: staying hydrated internally does as much for your tan as anything you put on your skin externally. Well hydrated skin holds color more evenly and takes product better from the very first application.
What You Need to Self Tan
Build a simple kit. It saves time and keeps results consistent.
- Exfoliating mitt or scrub and a razor.
- Self tanning mousse for full body coverage.
- Body tanning mist for touch ups and hard to reach areas.
- Face tanning mist for gentle, acne safe color.
- Gradual tanner to extend your glow.
- Men's tanner for thicker body hair and skin.
- Loose, dark clothing, a clean mitt, and a small blending brush.
Keep tools clean. Here is how to clean your self tanning mitt. Toni says this is one of the most overlooked parts of a good tan. A mitt with built up product from old applications will give you uneven, streaky results no matter how good your technique is, so she never reuses a dirty mitt.
Her honest take on both exfoliating and using a clean mitt: skipping them does not save you meaningful time. You are going to spend roughly the same number of minutes applying your tan either way. So why settle for an okay result when a great one takes the same effort? A clean mitt and a properly exfoliated canvas are the two easiest ways to make sure the product goes on smoothly, develops evenly, and actually lasts.
How to Apply Self Tanner by Product Type
What to apply self tanner with matters. A soft velvet mitt gives the smoothest finish. Pump product onto the mitt, not your skin. Start at the ankles and move upward. Use light pressure and keep a steady pace so the guide color stays even. Save hands and feet for last and use only what is left on the mitt.
Our co-founder Toni spray tanned professionally for years before MAKAI, working with hundreds if not thousands of clients from Dallas to Utah and coast to coast, and that experience shaped how she approaches self tanning at home too. One thing she always tells people: unlike a spray tan or many other self tanners on the market, you do not need to apply a barrier cream or lotion to your elbows and knees before using MAKAI. The formula is built to develop evenly without it.
That claim did not come from a lab spec sheet. It came from Toni hearing the same complaints over and over, booth after booth, client after client: tans that felt sticky, tans that smelled off, color that faded weird within a few days, and product that rubbed off on clothes and sheets. When we sat down to build MAKAI's formula, we went through at least 12 rounds of testing to actually solve those specific problems instead of just launching another tanner that looked good in a bottle. Applying without a barrier cream is one of the results of that process.
Self Tanning Mousse
The video above is a complete walkthrough of how to apply any MAKAI self tanning mousse to the body, step by step, from your first pump of product to your last blend at the ankles.
Mousse is fast and beginner friendly. It spreads easily and dries down clean.
- Exfoliate the day before. Lotion dry spots just before you start.
- Apply in long sweeping motions with a mitt. Do not oversaturate.
- Use leftover mousse for hands and feet to avoid heavy edges.
- Buff wrists and ankles with a small brush for a seamless fade.
- Rinse after 2 to 6 hours based on desired depth. Pat dry.
- Moisturize every day to keep color even.
If you have never self tanned before, or your skin does not normally tan on its own, the color can feel drastic right after you apply. That is completely normal. A well formulated tanner like ours will settle into a more natural tone once you rinse it off. Most formulas give you instant color on application, but the real development happens after that, which is why so many people notice their tan actually looks deeper and more natural the day after they rinse, not the moment they apply it. Waiting it out instead of judging the color too early makes a big difference.
These steps work for everyone. Our self tanner for men follows the same process, formulated for thicker skin and body hair with the same streak-free result. For a deeper breakdown of what works best, read our full guide to the best self tanner for men.
Self Tanning Lotion
Lotion gives more slip and extra hydration. It is great for dry skin and newbies.
- Squeeze a small amount onto your mitt, not your hands.
- Start at ankles and work upward in circular motions.
- Blend lightly over joints and dry zones to prevent dark patches.
- Let it absorb fully before you dress.
Using Tanning Mitts and Applicators
A mitt gives the most even coat and keeps palms clean. If you do not have a tanning mitt, use tight fitting disposable gloves plus a soft microfiber cloth. For edges and small areas use a dense makeup brush or a kabuki brush. For your back use a back applicator or a long handled brush.
If you do not have a back applicator yet and there is nobody around to help, Toni's advice is simple. A back mitt is genuinely the easiest option if you can get one, but in a pinch you can attach your regular mitt to anything long enough to reach, a flat spatula works surprisingly well. Pump your product onto the mitt, check your coverage in the mirror as you go, and keep applying until you are happy with how it looks.
No mitt on hand? Use gloves and a microfiber cloth, or a clean sock over the glove in a pinch. Always blend with light pressure and finish with a small brush around wrists and ankles. Struggling with your back, shoulders, or backs of arms specifically? Our guide on applying self tanner to hard to reach areas walks through it in more detail.
How to Self Tan Your Face
Watch above for a complete walkthrough of how to apply the MAKAI Face Mist, step by step, from prep through blending.
Facial skin needs gentle formulas. Look for non comedogenic options that hydrate and will not clog pores. If you want a self tanner for face that will not cause breakouts, choose light mists with aloe and jojoba oil.
- Cleanse and exfoliate lightly. Pat skin dry.
- Apply a thin barrier to brows and hairline to avoid buildup.
- Hold mist 6 inches away. Spritz evenly across forehead, cheeks, chin.
- Blend with a sponge or mini mitt, especially along the jaw and hairline.
- Let it develop before makeup.
Technique tip: use a clean mini mitt, dab in tiny amounts, and buff outward with light pressure for a seamless finish. Shop Makai Face Mist
How to Use Body Tanning Mist
This video is a step by step how-to on applying the MAKAI Bronzing Mist, showing exactly how close to hold it and how to blend it in.
Use body mist for fast top ups and hard to reach spots like shoulders and back.
- Hold the nozzle 6 inches from skin and spray in light passes.
- Blend with a mitt to smooth any edges.
- Use on hands and feet for quick color correction.
Choosing the Right Self Tanner for Your Skin
Pick by format, shade, and lifestyle. Mousse for full body control. Lotion for dry skin. Mist for speed and reach. Face mist for gentle glow. Men's tanner for quick dry and thicker skin. Not sure whether mousse or lotion is the better fit? Our full breakdown of mousse vs. lotion vs. cream walks through exactly which one to choose. If you are not sure where you fall, use our Find Your Glow shade quiz for a personalized pick in under a minute.
Here is the truth though: the perfect tan is not sitting in a bottle, and it is not one size fits all. The perfect self tanner is whichever one makes you feel the most like yourself.
Self Tanning for Different Skin Types
- Dry skin: Choose hydrating lotions and gradual tanners. Moisturize AM and PM.
- Oily skin: Use oil free, fast drying mousse. Tone before you tan.
- Sensitive skin: Choose fragrance free and hypoallergenic formulas. Patch test.
- Combination skin: Use lighter textures on oily zones, richer ones on dry areas.
Choosing Your Shade
Fair to light skin does best starting with a Light to Medium shade for a soft, natural glow you can build on with a second application. If you are just starting out or want a lighter result, our guide to the best self tanner for pale skin goes deeper on formula and shade picks. Light to medium skin tones tend to reach for our Dark shade, our best seller, for deeper color. Olive to dark skin tones often prefer Ultra Dark for a bold, even bronze that works with natural undertones. And if you're wondering whether any of this changes with age, it doesn't, our guide to the best self tanner for mature skin covers why shade choice always comes down to skin tone, not the year you were born.
Browse the full self tanner collection or visit our sunless tanner guide to compare all formulas side by side.
Pro Tips for a Flawless, Long-Lasting Tan
The single biggest mistake Toni sees first time self tanners make is not letting their tan dry fully before getting dressed. Skipping that step is the fastest way to end up with transfer on your clothes. Once you have applied, wait until your skin is completely dry, then put on something loose and breathable. Toni's go to after tanning has always been one of her husband's old dri-fit football shirts, lightweight, breathable, and exactly what your skin needs while it develops.
She also never skips exfoliating beforehand and always waits a few minutes afterward for her pores to close. That small pause keeps the application seamless and helps the color go on far more naturally.
- Use leftover product on your mitt for hands and feet.
- Make claw hands to avoid pale knuckles.
- Sleep in dark clothes if you tan at night.
- Buff wrists and ankles with a kabuki brush for seamless edges.
- Wash palms with soap after each section.
- Wear loose, breathable fabric like dri-fit while your tan develops to avoid transfer.
Tanning Before a Big Event
If you have a wedding, photoshoot, or any big event coming up, do not try a self tanner for the first time the night before. Test it two to three weeks out so you know exactly how it fades, whether you like the color depth, and how it feels on your skin over several days. This is the same advice Toni gives every bride who ever sat in her chair. A tan you already trust is one less thing to stress about on the actual day.
How to Make Your Self Tan Last Longer
Keep color even and resist fade from sweat, showers, and pools.
- Shower with cool water. Pat dry, do not rub.
- Moisturize morning and night with tan safe lotion.
- Limit hot tubs and chlorine. Rinse before and after swimming.
- Top up with gradual tanner every 2 to 3 days.
- Exfoliate lightly on day 3 to 4 to avoid patchy fade.
Toni treats maintenance as its own small routine. She uses the self tanning mist for a little extra build between full applications, and reaches for the gradual self tanning lotion daily along with her regular moisturizer to keep color topped up without committing to a full reapplication. Both the Medium and Dark mousse are genuinely buildable, which is why the color fades evenly instead of wearing off in patches.
Pool tip: rinse skin with fresh water before you get in, apply a thin layer of tan safe moisturizer as a barrier, and rinse after. Reapply gradual tanner that night to keep color even. Tanning through the colder months brings its own challenges too. Dry indoor heat and heavier clothing can fade and rub off color faster, so it is worth reading how to get a tan in the winter for a season specific routine.
Get the full plan in how long does self tanner last?
What to Wear While Your Tan Develops
What touches your skin while your tan develops matters more than most people realize. Patt actually noticed this firsthand: Toni's top half, in one of his old dri-fit football shirts, would come out noticeably darker than her bottom half in cotton sweatpants, on the exact same tan, the exact same night. Cotton holds onto moisture and rubs against skin differently than breathable, moisture-wicking fabric, and that difference showed up as a real, visible gap in color depth between the two halves of her body.
Since noticing that, breathable fabric head to toe has become part of the routine, not just an old football shirt on top. We are actively developing dedicated post-tan wear, along with exfoliating mitts and wrist scrunchies, to make this easier without having to raid your husband's old practice gear.
On that note, the wrist scrunchies solve a problem most people never think about. When you wash your face or run through a skincare routine, water naturally travels down your forearms and drips onto your wrists, hands, elbows, and even your torso. If your tan is still developing, those repeated drips can create lighter patches or streaks wherever the water sits. An absorbent wristband catches that water before it ever reaches your skin, which matters most in the first several hours after applying, when minimizing water exposure makes the biggest difference in how even your final result looks.
Removing Self Tanner
When it is time to reset, be gentle. A self tanning bath soak helps loosen old color. Use a tan remover or a mild exfoliating mitt after a short soak.
- Soak 10 to 15 minutes in warm water. Add a tan remover or a gentle bath oil.
- Buff in circles with an exfoliating mitt. Do not scrub hard.
- Spot correct with a baking soda paste or micellar water on a cotton pad.
Protecting a fresh manicure: apply a thin layer of petroleum jelly over cuticles before you tan. If color still develops, use a cotton swab dipped in acetone free remover. Tap lightly, then rinse and re moisturize.
In the video below, Toni walks through her own rinsing routine and what has worked best for her over a decade of self tanning. It is worth watching because of who is demonstrating it. Toni is naturally fair skinned and gets red in the sun rather than tanning on her own. People who meet her in person often assume she is naturally tan, and some have even guessed she is not American because her color looks so deep, even, and natural. That result is entirely from MAKAI and the routine she is about to show you, not from any sun exposure.
For a full breakdown of every method, from bath soaks to specialty removers, see how to remove fake tan, best methods and tips, or go straight to how to remove self tanner from hands.
Troubleshooting and Common Mistakes
Quick fixes keep your glow on track.
- Common mistakes: Skipping exfoliation, applying too much, tight clothes too early, soap in the first rinse, no SPF.
- How to fix missed spots: Mix a pea size amount of tanner with lotion and blend over the pale area. Feather the edges with a brush.
- What to apply with: A velvet mitt. No mitt on hand, use gloves and a microfiber cloth, then finish with a brush.
- Patchy fade: Warm soak plus gentle exfoliation resets patchy areas.
One of the most common issues Toni saw over and over in her spray tanning chair was clients coming back frustrated that their ankles, knees, and elbows kept turning out noticeably darker than the rest of their body. After talking through their routine, the pattern was almost always the same. It was not the tanning solution causing the problem. It was dry skin in those spots soaking up more product. Once she started applying a small amount of moisturizer to those dry areas before tanning, the color developed far more evenly. If you keep getting dark ankles or elbows no matter what product you use, check your skin prep before you blame the formula.
You will also see some tanning advice recommend exfoliating a full 24 hours before you apply, and other advice, including some dermatologist guidance, that suggests applying to slightly damp skin. Our approach, based on what has actually worked for Toni over a decade plus of professional and personal experience, is to exfoliate shortly before you apply and make sure skin is fully dry when the product goes on. Fully dry skin gives DHA a clean, even surface to react with, without any lotion or moisture sitting between the formula and your skin diluting the color.
It is worth mentioning here too: Toni is genuinely her own first test case for almost everything in this guide. If she runs into a problem with a tan, the honest truth is most people run into that exact same problem. A solution that works for her is very often a solution that works for everyone else too, which is part of why so much of this guide is written from her own trial and error instead of a general script.
Self Tanning FAQs
Can I swim after tanning?
Wait at least 8 hours and rinse after pools or the ocean.
How long after applying self tanner can I shower?
For most of our formulas, you can rinse in as little as 2 hours if you're going for a lighter result, but waiting closer to 8 hours gives the color the most time to fully develop and gives you the deepest, most even result. If you're not in a rush, the extra wait is worth it. Whenever you do rinse, use lukewarm water, not hot, and pat dry instead of rubbing.
Will it stain clothes?
Let skin dry fully and wear loose, dark clothing.
Is it safe in pregnancy?
Check with your provider and choose lotions or mousses. DHA only reacts with the outermost layer of skin, but every pregnancy is different, so a quick check with your provider first is always the right call. For the full picture, including what our co-founder Toni learned tanning dozens of pregnant clients as a professional spray tan technician, read our full breakdown on self tanner safety.
How often should I reapply?
Every 3 to 5 days. Use gradual tanner between full applications. For a deeper breakdown of how the right schedule changes based on the look you're going for, see our full guide on how often you should self tan.
Should I exfoliate right before tanning or the day before?
Either can work, but Toni exfoliates about 10 minutes before applying and always makes sure skin is completely dry first. Fully dry skin gives the formula an even surface to develop on.
Do I need to test a new self tanner before a big event?
Yes. If you have a wedding, photoshoot, or event coming up, test your tanner two to three weeks ahead so you know how it fades and how it feels before the day that actually matters.
Why Hydration Matters for Your Tan (and Your Skin)
In the video below, Patt and Toni break down why hydration matters, not just for how long your tan lasts, but for your skin and overall health. This is not casual advice from either of them. Toni is a licensed physical therapist credentialed in over 40 states who regularly completes continuing education, and Patt played football at multiple levels before personal training at Equinox, where he studied under PhDs in biomechanics. Hydrated skin holds color more evenly and sheds more gradually, which is a big part of why well hydrated skin tans smoother and fades less patchy than dry, dehydrated skin.
Shop the Makai Self Tanning Collection
Ready to build your kit? Browse our full self tanner collection to shop every format in one place, or go straight to a specific product below.
- Self Tanning Mousse
- Body Mist
- Face Mist
- Gradual Lotion
- Men's Tanner
- Self Tanning Mitt
- Back Applicator
- Bundles & Sets
- Find Your Glow Shade Quiz
Keep Reading: More Self Tanning Guides
- How to Apply Self Tanner to Hard-to-Reach Areas
- How to Remove Fake Tan: Best Methods and Tips
- The Best Self Tanner for Pale Skin
- How to Get a Tan in the Winter
- Best Self Tanner for Men
- Best Self Tanner for Mature Skin
The Bottom Line
Self tanning should feel easy and look natural. Prep well, apply with a mitt, blend edges, and hydrate daily. Our co-founder Toni has spent over a decade perfecting her own routine, including years spray tanning professionally for hundreds if not thousands of clients from Dallas to Utah and coast to coast, and everything in this guide comes straight from what actually works, not what sounds good in a marketing headline.
MAKAI exists because of a health scare, not a business plan. Toni started self tanning as a teenager after her mom was diagnosed with late stage melanoma. Her mom survived, but that experience made skin safety something our family has never stopped thinking about. It is why Toni built an entire career around helping people get color without UV exposure, why we went through 12 or more rounds of formula testing before MAKAI ever launched, and why this guide exists in this much detail instead of a quick 500 word overview. The goal has always been simple: get your glow without the risk.
The best self tan was never about chasing hacks. It is about understanding your skin. Every tip in this guide exists for a reason, whether it is protecting your skin barrier, reducing friction, minimizing unnecessary water exposure, or preparing your skin for even color. Small habits, repeated consistently, produce the biggest difference. That is the philosophy behind every recommendation Toni makes: understand the science, simplify the routine, and help you achieve a natural-looking glow with confidence.
Ready to glow? Shop the Makai Collection


